
Growing Chestnut Mushrooms at Home
Mushrooms have gained so much popularity recently and it's not hard to understand why. Besides their incredible health benefits, they are also used in many different recipes. Among these gourmet, species is the chestnut mushroom (Pholiota adiposa), which has been enjoyed for centuries in Japan but remains relatively unknown in the Western world.
Due to their attractive color, full flavor, and delightful texture, these mushrooms gained so much popularity recently. Therefore, they are now being cultivated by growers all over the world, from Japan and Australia to Europe and North America.
Let's take a better look at this wonderful mushroom specie and discuss how to grow your own chestnut mushrooms at home.
What Are Chestnut Mushrooms
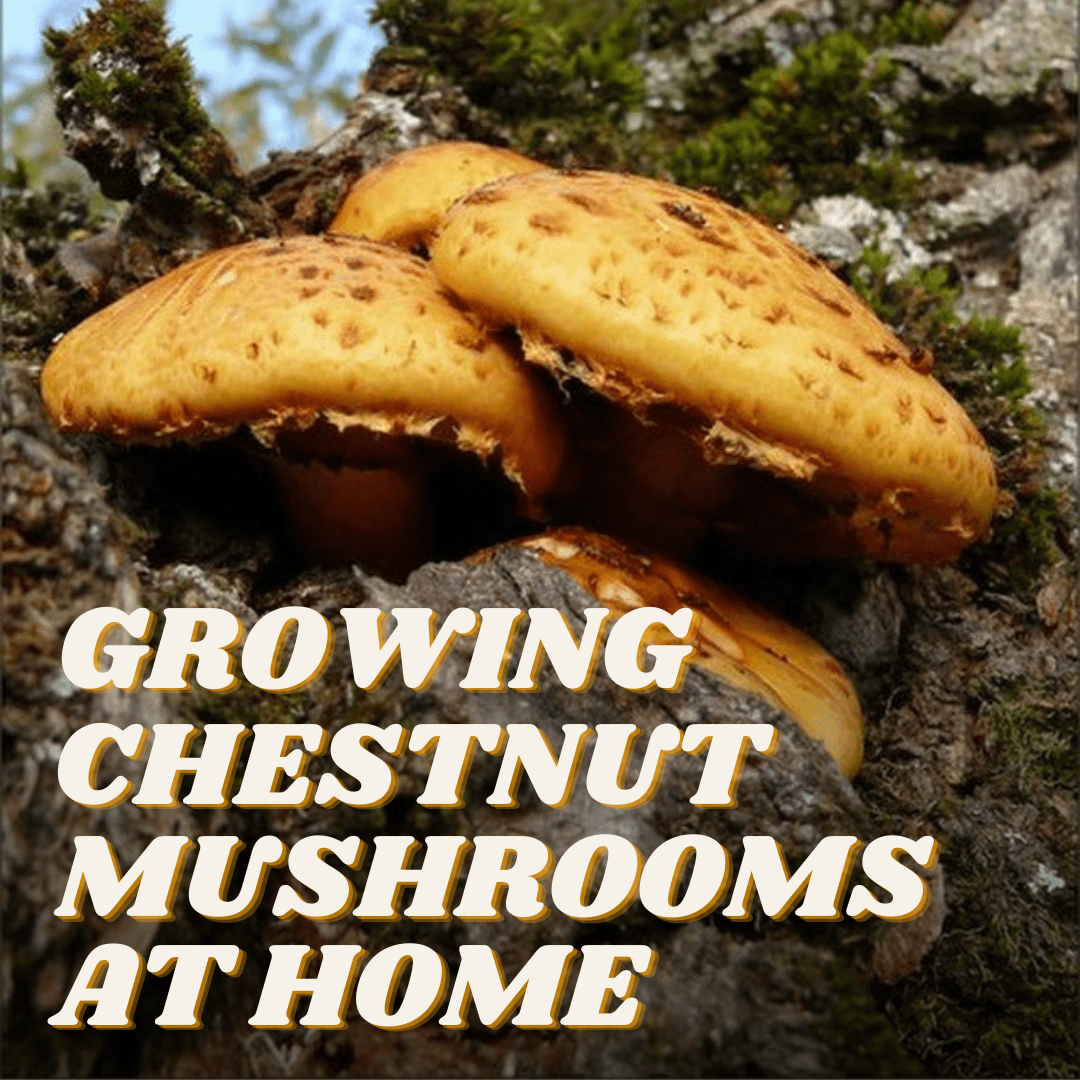
The chestnut mushroom, also known as cinnamon caps or fat Pholiota, is scientifically called Pholiota adiposa and is referred to as numerisugitake mushrooms in Japan. These saprotrophic mushrooms, sometimes parasitic, grow in dense clusters on rotting wood in the wild.
The name Pholiota adiposa hints at the appearance of the chestnut mushroom, with "Pholiota" meaning scaly in Latin and "adiposa" derived from the Latin word for lard or grease, "adeps." The caps of chestnut mushrooms are brownish with scales, often slightly shaggy, and have frilly white veil fragments when young. While their caps can be slimy when wet, they are only slightly greasy when dry.
It's important not to mistake them for a darker variety of the common brown button or cremini mushrooms (Agaricus bisporus), which are sometimes marketed as chestnut mushrooms due to their shape and color.
To differentiate them from cremini mushrooms, look for these characteristics:
Caps – Chestnut mushrooms have convex brownish-yellow to rust-orange caps, 2 to 4 inches (5 to 10 cm) in diameter, with brown scales denser towards the center. Younger mushrooms have frilly white veil fragments attached to the scales.
Gills – Their gills are pale yellow to tan, turning reddish-brown to orange as spores form.
Stems – The stems are round, pale yellow to tan, 0.2 to 0.4 inches (5 to 10 mm) in diameter, and 1 to 2.5 inches (2.5 to 6 cm) tall, with scales that often join at the base where they attach to the substrate.

How To Grow Chestnut Mushrooms
Mushrooms are demanding. In nature, they thrive in very specific climate conditions, and to successfully grow them at home you will need to recreate those conditions in a controlled environment. If the growing conditions do not match the necessary requirements, such as too much light, insufficient humidity, or extreme temperatures, the mushrooms will not grow.
It's crucial to keep in mind that any changes to the growing conditions during the growth cycle can cause the entire mushroom-growing project to fail. So, it's essential to maintain the necessary conditions throughout the process.
#1 Get Chestnut Mushroom Spawn
To grow chestnut mushrooms, the first step is to obtain the mushroom spawn or spores. Spores are the reproductive bodies of mushrooms, similar to seeds, and are usually harvested from the underside of the mushroom cap.
Each spore contains all the essential elements necessary to form new fungi. When the spores germinate, they create a network of cells known as mycelium. This mycelium is then transferred onto a substrate that provides support and promotes its growth. The entire structure of mycelium and substrate is called the spawn.
#2 Get The Substrate
The substrate is the growing medium, also referred to as "soil," that is used to cultivate mushrooms. In simple terms, it is the material in which the mycelium grows and develops into mature mushrooms.
There are three main types of substrate that growers commonly use for growing chestnut mushrooms, and depending on how you choose to purchase your spawn, it may already be in the substrate:
Hardwood Sawdust Spawn
Hardwood sawdust is a popular substrate for mushroom cultivation due to its widespread availability and affordability. Sawdust spawn is created by inoculating the sawdust with live mycelium, which then colonizes the substrate. Once the sawdust spawn is fully colonized, it can be used to inoculate other substrates or fruiting blocks.
Grain Spawn
Grain spawn refers to a container filled with live mycelium-colonized grains. The grains used are typically agricultural seeds such as wheat, rye, millet, and milo. Unlike edible kernels like rice and corn, the starchy substance inside these seeds serves as an ideal food source for mycelium.
The grain spawn is usually white, but its appearance may vary depending on the type of grain and the specific mushroom species and variety used.
Plug Spawn
Mushroom plug spawn is a user-friendly and convenient method for growing mushrooms at home. A typical bag of mushroom plug spawn consists of around 100 mushroom plugs which can be used for inoculating logs and stumps. If you are looking to use fiber or wood substrates for mushroom cultivation, plug spawn is also a great option. It easily colonizes logs, wooden stumps, and even cardboard. Plug spawn is typically created by inoculating mycelium onto a collection of live mushroom stems or small wooden dowels.

#3 Inoculation
In this step, you will introduce your chestnut mushroom spawn onto your chosen substrate. If you're using a growing kit, the substrate will generally already be colonized with the chestnut mycelium.
We recommend using sawdust as it is the easiest substrate to inoculate properly, especially if it's your first time. You can also try a substrate made from potting soil, peat moss, and compost, although this method requires more care and attention.
To use this method, mix equal parts of sterile compost, potting soil, and peat moss in a container. Then, add the chestnut spores to the surface of the soil and water the mixture until it's moist. Cover the container with clear plastic wrap and poke holes in the surface to create air passageways.
Your mushroom spawn will usually come with inoculation instructions, which we recommend following.
#4 Incubation
Following the inoculation process, the spawn requires time to grow throughout the substrate, which is referred to as incubation. The initial leap off stage marks the moment when the mycelium first spreads from the spawn onto the new substrate, usually taking place approximately four days after inoculation. Here are the instructions to follow:
-
Place the inoculated substrate in a dark location.
-
Mist the substrate with water daily to maintain moisture.
-
Avoid exposing it to direct sunlight.
-
Maintain the temperature between 60°F and 80°F.
During incubation, the mycelium will completely colonize the substrate. This process can take anywhere from a few weeks to a few months. Once completed, you should observe a white mycelium mat completely coating the surface, indicating it is ready for fruiting.
#5 Fruiting Chestnut Mushrooms
Once the substrate is fully colonized, the next step is to initiate the fruiting process, which involves prompting the substrate to produce the actual mushrooms, also known as fruit bodies. The method chosen for fruiting depends on personal preference and the type of substrate being used.
After a few days of incubation, you will start to see small pinheads forming on the surface. These will eventually develop into full-sized chestnut mushrooms, which take approximately 7 to 10 days to mature from the pin stage.
During this phase, it is crucial to provide adequate airflow for the mushrooms. Adequate airflow will eliminate the carbon dioxide mushrooms produce and exchange it with fresh air, ignoring this parameter can lead to your mushrooms suffocating.
Here are the recommended conditions for creating an ideal fruiting environment when growing Chestnut mushrooms:
For primordia formation, maintain a temperature of 59-64°F and a humidity of 95%.
If you don't see any pins popping out for a few days, don't worry as it can take some time for them to form. After the first pins appear, it's recommended to raise the temperature and lower the humidity for a day or two.
For fruit body formation, maintain a temperature of 63-70°F with the ideal temperature being 64-66°F (18-19°C). The recommended humidity level is 85-90% and the CO2 concentration should be between 500-2000 ppm.
#6 Harvest
Your chestnut mushrooms will be mature and ready for harvest about a week after the pinheads have formed. To pick them, simply twist or gently pull them away from the substrate on which they are growing. Be careful not to remove too much soil as this will allow for more mushrooms to grow.
In about one to two weeks, you will have another crop of mushrooms ready for harvesting. However, each subsequent harvest will produce fewer mushrooms as the substrate is depleted. With chestnut mushrooms, you can expect to have anywhere from 2 to 4 flushes.
Conclusion
Growing your own chestnut mushroom can be a fun and rewarding process. It's great since you eliminate the risk of accidentally consuming the wrong mushroom while foraging. Also cultivating your own mushrooms provides a convenient and safe way to implement healthy mushrooms into your diet. To successfully grow chestnut mushrooms just follow the steps we previously talked about and you will without a doubt enjoy your own, home grown, chestnut mushrooms.